
The Perfect Roast Chicken
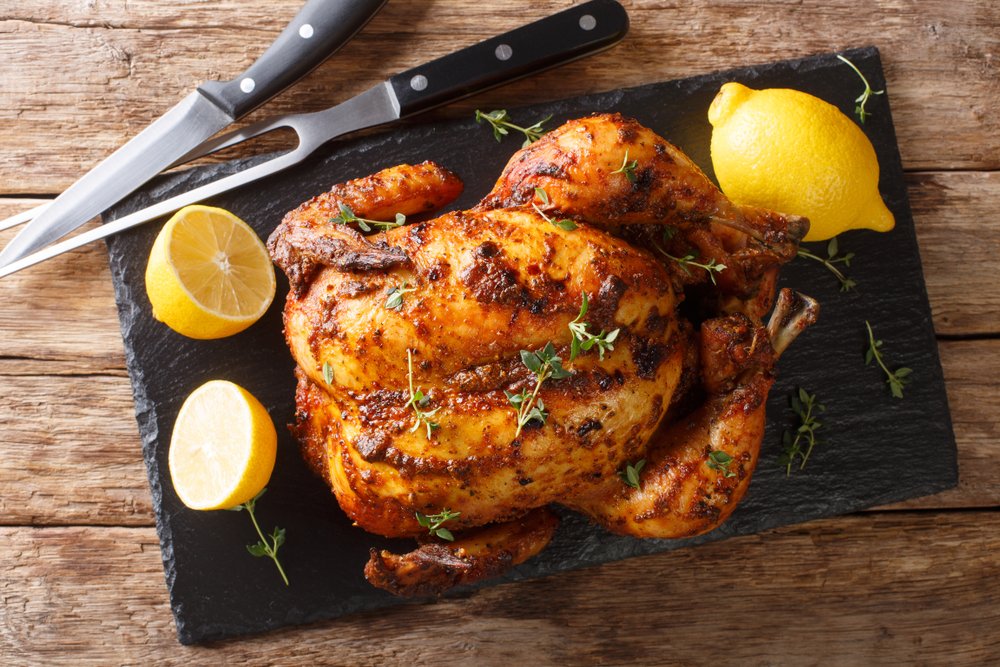
I love roast chicken. I might go so far as to say it is my favorite dish. It has all of the elements of a perfect meal - succulent, crispy, juicy, and full of great flavor.
My first introduction to roast chicken, and I mean real crispy, juicy roast chicken, was in the south of France in my twenties. Every French market has a vendor roasting rows of glimmering shimmering chicken turning on a rotisserie dripping fat onto slowly roasting potatoes. My nose would guide me to the spot as the aroma wafted through the market. I would just point and the vendor would pop a piping hot chicken into a paper sack along with a good helping of potatoes bathed in the fat the chicken so generously shared . I would buy a bottle of cold wine and sit in a park to eat, sharing the feast with other backpackers exploring the region.
I returned home after falling in love with this meal to find only grilled chicken and, eventually, the ubiquitous Chicken Out and other chains like it. They never got that perfect combination of flavors and textures that I experienced in France.
So, I began the quest to create a method that produced that perfect combination of flavorful, aromatic, and crisp. There are three things that characterize the perfect roast chicken. The first is a very crispy skin. The second is a very tender and juicy breast. The third is a bird packed with flavor.
I tried the popular method of roasting the chicken in a hot oven, 500°. The theory here is that the quick cook of a high temperature will crisp the skin while keeping the breast tender. This is a challenge in cooking the perfect roast chicken. That lean breast can dry out, but cook too slow and low and you won’t get the crispy skin we all love.
I found that this method deprived the chicken of time to infuse the flavors added when prepping the chicken (lemon, parsley and butter are typical in France). There is also a risk of drying out the breast is cooked even a bit too long. My quest continued until I tried the method below. I got all of the features I sought and this is now my go-to method for my weekly roast.

Chickens and potatoes roasting in Provence, France
Buying Your Bird
If you are fortunate enough, like I am, to live in a place that offers a butcher working with local farmers, buy your chicken there. You will taste a difference. I buy my chickens from a Halal butcher @DCPoultry in Alexandria. They raise the chickens from little peeps giving them a free range life and a good natural diet. I buy red hens, which they refer to as organic. The white chickens with the large breasts we see in most supermarkets are GMO birds bred to grow more quickly and produce an unnaturally large breast, the meatiest part of the chicken. I find this breed to be flavorless and I can’t enjoy a chicken that has had such an unnatural and unhealthy life. If a supermarket is your only option, look for a chicken that is slightly pink in color and has some give when poked with your finger.
Cook’s Illustrated rates Bell & Evans Air Chilled Premium as the best supermarket brand because they feed chickens an all-vegetable diet (their preference) and never use antibiotics.
Tips for the Perfect Roast
If you buy a freshly butchered chicken, wait 24 hours to cook it. Just leave in the refrigerator overnight.
Remove the bird from the refrigerator 30-40 minutes before roasting. You want it to warm up a bit to prevent steaming
Dry the bird inside and out before beginning preparation
Assemble your mis en place including all of your seasoning and the vegetables that will roast along with the chicken. Have your roasting pan ready.
The Roasting Pan
My preferred roasting pan is a cast iron skillet. Cast iron will get hot and retain its heat throughout the cook even when you open the oven to flip the bird. I place some sliced potatoes under the chicken to elevate it a bit so the juices run onto the vegetables.
Many people like to use a roasting pan with a rack; this works great, too. The rack is perfect for elevating the chicken so the juices drip onto the vegetables.
I have also used a clay pot; clay is great for keeping its contents super moist and juicy. My mother had a Römertopf clay roaster that she always used for roasting chicken and beef. These were very popular in the ‘60’s.
The bottom line is this - almost any sort of pan will work; just be sure you give the chicken a little boost up so heat surrounds the chicken allowing the bottom to cook and the juices to run free.
I hope you love the results of this recipe and The Perfect Roast Chicken becomes a weekly favorite in your home.
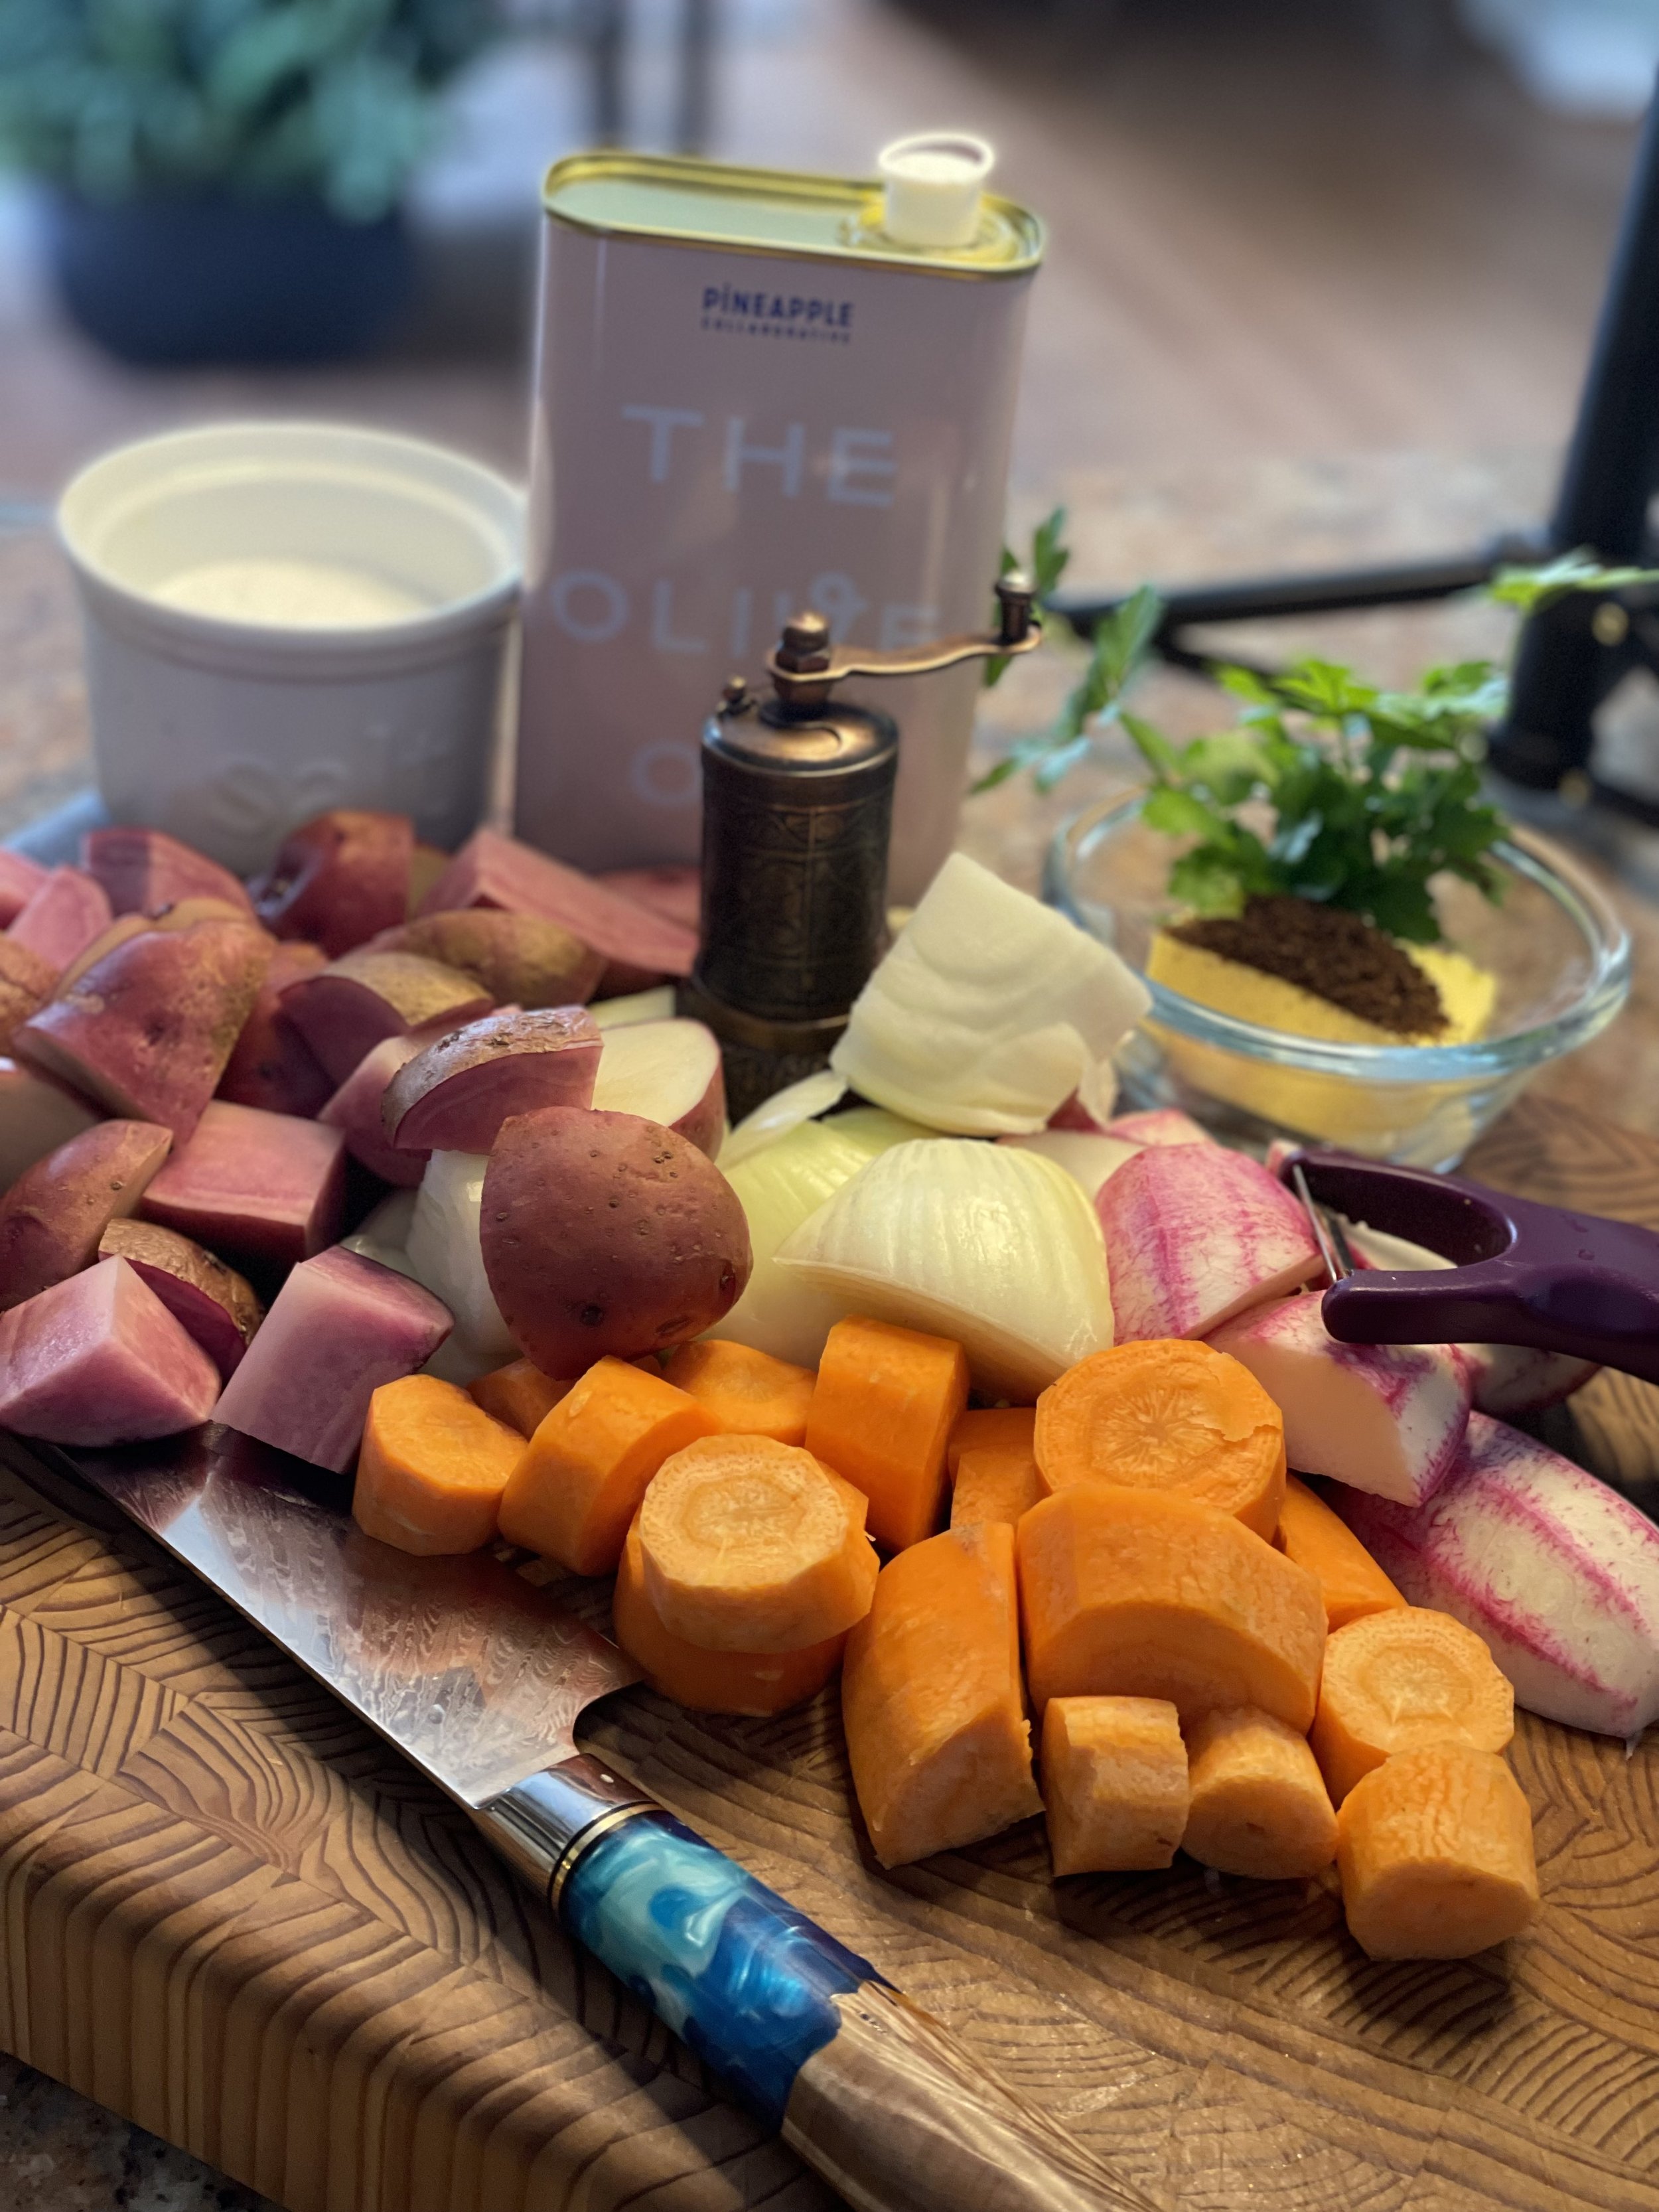
Carrots, onions, and potatoes ready to cook with the chicken

Perfect Roast Chicken
Ingredients
Instructions
- Unwrap your bird and dry inside and out with paper towels (do not rinse with water)
- Zest the lemon. Put the lemon aside for now
- Loosely chop the herbs
- Take all of the lemon zest and the chopped herbs and, using a fork, mix into the softened butter (or stir into the olive oil if using).
- Take a finger and loosen the skin just over the cavity. Work your fingers gently toward the back of the chicken loosening the skin as you go.
- Once the skin is loosened, take a nice glob of softened lemony herb butter (or a pour of olive oil) and work it under the skin rubbing over the breast as far as you can go.
- Now, rub all over the outside of the bird, top and bottom, inside and out, with the remainder of the lemony herb butter. Liberally salt and pepper the entire chicken inside and out.
- Cut the lemon and garlic head in half and stuff each into the cavity of your bird. Add a few more fresh herbs if you have any.
- If using a cast iron skillet (my favorite roasting vessel), lightly oil the surface.
- Put your cut potatoes in the middle of your roasting pan (I use a cast iron skillet). Sprinkle with salt.
- Rest the prepared bird on top of the potatoes breast side down
- Arrange the carrots and onion around the bird. Feel free to add more potatoes or any root vegetable to the mix.
- Lightly drizzle olive oil on the vegetables
- Preheat oven to 475º
- Place loaded skillet in the oven
- Roast for 15 minutes
- Remove skillet and flip your bird so it is breast side up (use heavy tongs)
- Reduce oven temperature to 325º
- Every 20 minutes, pull the oven shelf out and baste the bird, then turn the skillet 180˚
- A 3 Lb bird will take almost an hour. At 40 minutes, check your temperature. I remove my bird at 145º for optimum moistness. See note below on temperature.
- The last 10 minutes of your cook, increase temperature to 500º to crisp up the skin (this is optional; the skin will be fully cooked; increasing the temp gives you a brittle crispiness some love).
- NOTE: the FDA says to cook poultry to 165º. Salmonella (should it exist) dies at 136º, so I feel safe at 145º and have long removed my birds at that temperature. But, by all means, follow the guideline that makes you comfortable. If you want your bird at 165º, remove it from the oven at 160º as it will cook more while resting.
- Rest the bird on a cutting board for 15 minutes before cutting. You can keep the vegetables in the skillet in a warm oven (200º).
- Once rested and cooled enough to handle, cut up the chicken and serve on a platter with the vegetables. The jus in the skillet is great for drizzling or dunking a chunky piece of bread.
Notes
Other flavor options
Peruvian
3 Tbl olive oil
2 Tbl butter, softened
4 cloves garlic minced
1/4 cup lime juice (about 2 limes); save juiced limes
1 Tbl ground cumin
2 Tsp paprika
2 Tsp sugar
1 Tsp ground black pepper
1 Tsp ground oregano
Mix all together and rub under the skin; inside and outside the bird. Stuff the bird with the juiced limes (yes, repurpose those!); 1/2 garlic head; bunch of cilantro
Persian
3 Tbl olive oil
2 Tbl ghee (or butter)
3 cloves garlic
1/2 cup lemon juice (about 1 large lemon; save lemon)
1 Tbl ground harissa
1 Tsp ground cumin
1 Tsp ground cinnamon
1 Tsp ground edible rose petals
1 Tsp ground chile pepper
Mix all together and rub under the skin; inside and outside the bird. Stuff the bird with the juiced lemon and a bunch of parsley
You should not rely on this information as a substitute for, nor does it replace, professional medical advice, diagnosis, or treatment. If you have any concerns or questions about your health, you should always consult with a physician or other health-care professional.


